

Property Preservation Winterization Overview
As a property preservation contractor, you will face many challenges. The biggest of these are winterization and de-winterization. It isn’t particularly tough work; however, it does have to be performed according to a strict protocol and newbies to the business will find themselves on a steep learning curve.
It’s important to get winterization and dewinterization activities right for one main reason: if you don’t, you may be liable for any expenses that are incurred as a result of improper maintenance.
There are two types of winterizations, dry and wet. Dry Heat systems are forced hot air, they will have furnaces, vents and/ or registers. Wet heat systems can either be “Steam Heat” or “Radiant Heat”. “Steam Heat” will have a steam boiler and steam running through the system, generally radiators. “Radiant Heat” will have a hot water boiler, expansion tank, and hot water running through radiators or copper tubing located in the floor, walls, and sometimes ceilings. Radiant heat may also be referred to as a “wet system” or “hot water baseboard heat.”
HERE’S WHAT YOU WILL FIND ON THIS PAGE
- Property Preservation Winterization Overview
- Materials and Tools Needed To Complete Property Preservation Winterizations
- Winterization Season Start and End Dates Schedule
- FHA Winterization Cost Schedule
- Documenting the Winterization
- Summary of How I Complete a Property Preservation Winterization Order
- How to Handle Frozen Properties
- Winterization Videos
- Tips For Winterizing a Home With Radiant or Steam Heat (also known as Wet Winterization)
- De-Winterizing a Property
- FHA Attachment Regarding Winterization Requirements and Cost Schedule
Materials and Tools Needed To Complete Property Preservation Winterizations
- Zip ties to secure shut-off valves at water meters
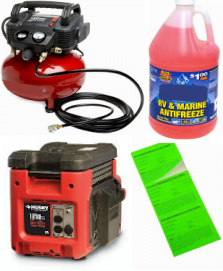
- Generator and extension cords
- Air compressor with operating gauge
- Air compressor hose fittings to connect your air compressor to spigot or the faucet located at the washing machine sink
- Shop Vac to drain water from toilet bowls and sinks
- Pink “non-toxic” antifreeze, sometimes called RV antifreeze
- Your client’s custom winterization sticker notices
- Clear winterization film to place over sinks and toilets
- Plunger
- Basic cleaning supplies
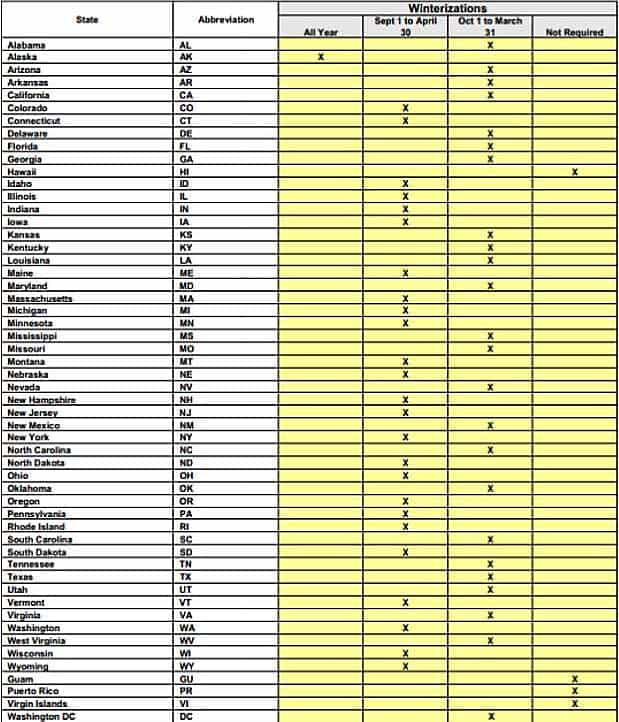
Winterization Season Start and End Dates Schedule
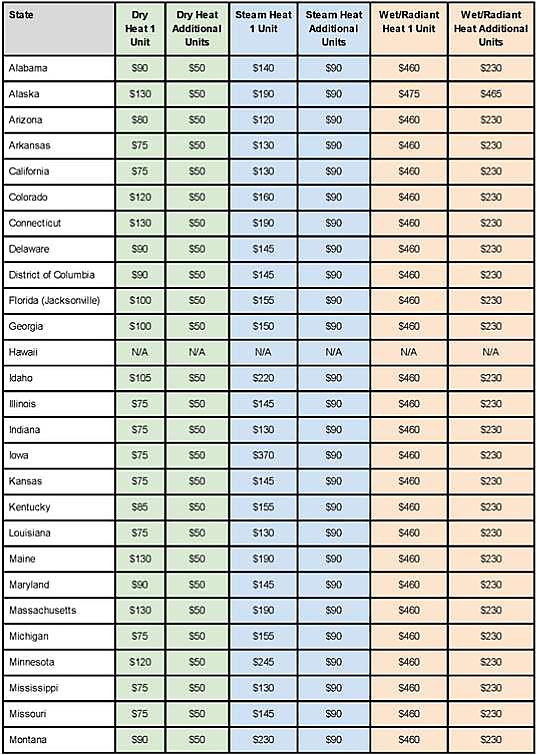
FHA Winterization Cost Schedule
Documenting the Winterization
You should always remember that you are liable for issues with your property preservation services, and winterization liability is at the top of the list.
Take the time to create a checklist for each procedure you perform for each client. So in terms of winterization, if you work for three different clients, you will have three different checklists – one for each. As you go through the checklist, modify it when you notice something is new or has changed. The in-house company policies and procedures manual (that you created yourself) should dictate that you keep master copies of each checklist. You should also keep a record of any changes and the date that they were made.
I appreciate that this is a lot of work, but it will be difficult to recall every step of every procedure for every property and for every client. See what I mean? It’s already sounding like a big job.
Don’t underestimate the need for iron-clad documentation. The day will come when you have to prove or disprove an allegation against you, so it is really important to keep more records for yourself than you ever submit to your clients.
Remember, the checklists included in this guide are only a starting point. Use them as a
template to create your own which you can revise and update as needed.
Winterization Photos
Photo documentation is critical, and you will be required to back up all winterization work with high quality photos. You will not be paid for work performed if it is not fully photo documented, and there are no exceptions.
It is your responsibility to submit before, during, and after photos of all work done. These photos will be used to justify any bids you are submitting and to document the property’s condition.
All photos must be right side up, and most companies prefer them to be landscape rather than portrait. Photos that are distorted, fuzzy, too light, too dark, or unclear in any way will usually be deleted by the company’s QC department. If you are lucky, they will request replacements, but if you’re not, they might just cancel the payment to you and send another contractor to do the job. It is very common for money to be withheld because of inadequate photos.
Do not send duplicates of photos. Specific photo requirements are often included on the work order, but if they are not, take time to find out your client’s individual requirements.
Take photos of all capped water lines; the cleaning of the toilets; the addition of antifreeze to all taps, fixtures, and appliances; the disconnecting of the water meter; the draining of the hot water tank; the zip-tie on the cut-off water meter if required by your client; and the blowing of the lines with the gauge visible.
All photos should be taken from the same angle and include a visible point of reference.
If you are conducting a steam winterization, be sure to include photos of the boiler, the expansion tank, and the RPZ valve. Also provide photos of the sump pump if there is one.
Winterization Stickers
Winterization stickers must be placed on the toilets, sinks, hot water tank, front door, or
picture window. Make sure that they are clearly visible in all winterization after-photos.
How To Complete a Property Preservation Winterization
STEP 1: Disconnect the Water Supply – You must attempt to locate the main water shut-off at the curb and make sure the shut-off valve is in the OFF position. Take 2-3 photos showing this process. Next you will locate the water meter and the main interior shut-off valve. Turn the main shut-off valve into the OFF position, disconnect the water meter and then connect a “zip tie” to the main water shut-off valve and finish by installing a 3/4″ black pipe “plug”.
STEP 2: Draining the System – Starting in the basement, make sure all gas line shut-off valves are in the OFF position throughout the entire property. Next you will connect a small garden hose to the water heater and then place the other end of the hose either into a floor drain or outside and proceed to drain all water from the water heater. If the property uses well water, you will drain all holding tanks and disconnect the electric to the well pump. Lastly, you will drain all the toilet tanks and toilet bowls.
Note(s): You can either use a siphon pump to drain the toilet bowl or you can use a small shop-vac. My crew has a small shop-vac that is used specifically for this purpose. Secondly, if you find feces in the toilet either you can clean it out or figure out a way to give your client a bid to replace a damaged toilet. Always remove a nasty toilet by having your helper disconnect it and place it into a large plastic commercial-grade garbage bag or two BEFORE CARRYING IT OUTSIDE.
STEP 3: Preparing To Blow Out Plumbing Pipes – Start at the main shut-off valve located near the water meter by connecting your pressure tester. Then follow the plumbing supply pipes throughout the entire property with the goal of making sure that all mid-line shut-off valves are in the OPEN position and all faucets are in the closed position. The few exceptions are as follows: all toilets that have a “fixture shut-off valve” need the valve to be in the CLOSED POSITION.
STEP 4: Pressure Testing the System – Turn your air compressor on and set the pressure at 35 PSI. Do not exceed 40 PSI as you may cause damage. Once the pressure builds up, take 2-3 photos showing your air compressor connected and another 2-3 photos showing the pressure gauge. Now you must once again follow the pipes while listening for a high pitched “whistling” noise, which would indicate breaks in the plumbing pipes. If any leaks are found, mark them by putting a piece of duct tape approximately 6″ away. Once you have marked all of them, proceed to take 2-3 photos of each damaged section of pipe. Make sure to take good quality pictures since those will be the only proof your client will have. Lastly, you must leave the air compressor connected for a minimum of 30 minutes.
Note(s): A good way I have found to prove that you actually completed an entire pressure test is by holding a cell phone near the pressure gauge and taking 1-2 pictures at the beginning and 1-2 pictures after 30 minutes. If there are no breaks, then your client will clearly be able to verify that you followed protocol because the gauge will show the needle in exactly the same position in both pictures. This method has saved me from chargebacks a few times when a plumbing leak showed up after I completed my pressure test.
STEP 5: Blowing All Remaining Water Out Of Plumbing Supply Pipes – Next, you will start at the laundry sink and turn the faucet into the ON position and you should immediately see a small amount of water flying out. Keep your camera handy because you will need to take 2-3 photos showing this water shooting out and 1-2 photos once the water stops. Repeat this process at ALL OTHER FAUCETS that will be located in each kitchen and each bathroom. And don’t forget to take photos at each faucet, even if there is no more water coming out. Your client will still want to see that you completed all of the steps and believe me when I say this: in your client’s mind, if you don’t have a photo of something then you didn’t do it. They will NEVER accept anyone telling them, “you can trust me”, in lieu of photos.
STEP 6: Add Antifreeze To Plumbing Drains – You need to pour antifreeze into all toilet bowls and tanks, all kitchen & bathroom sink traps, shower and tub traps, floor drains, and dishwasher drains. Take 1-2 pictures “during” each pour and also 2-3 photos showing each sink and toilet “before” and “after”.
Note(s): A typical single family with 1 kitchen and 1.5 bathrooms should take approximately 2 gallons of antifreeze.
STEP 7: Posting Stickers and Notices – Winterization notification stickers are applied to toilets, showers, tubs, water heater, water meter, dishwasher, and all sinks. Additionally, toilet wrap is installed on all toilets to further ensure they are not used. Notices are posted at the entryways of the home advising anyone entering that the property has been winterized and warning against the use of any plumbing fixtures.
FINAL NOTES: If a property has radiant or steam heat, you have several additional steps to complete. In addition to the preceding steps, you must also drain the boiler unit and expansion tank, loosen all of the bleeder pins on each radiator, complete a pressure test to all the plumbing pipes throughout this heating system and lastly, apply a winterization sticker to the boiler.
Your client will most likely have specific instructions for these types of winterizations.
How to Handle Frozen Properties
Do not attempt to undertake any winterization work if you find the property already frozen. Call your client to clarify their procedures for frozen properties and ask them for instructions.
If your work order does include instructions on how to proceed with frozen properties, follow these instructions closely. Some servicing companies have funds set aside for emergencies such as thawing the property, but others may require a bid to do this.
Make notes and take lots of photographs. Call the servicing company, and jot down the time and details of the call. A bid must be submitted for all damages, and all damages must be reported. Some companies require this report and the photos on the day that the damage is discovered.
If you are bidding to thaw a property, the bid must include at the very least:
- The number and types of devices to be used such as heaters and torches
- The number of people involved in the process and the approximate number of man hours
- A bid for pressure testing after thawing is complete
- A bid for winterization after thawing is complete
Winterization Videos
Identifying Various Types of Heating Systems
How To Complete Winterizations
How To Complete a Property Preservation Winterization Work Order: 4 Part Video Series
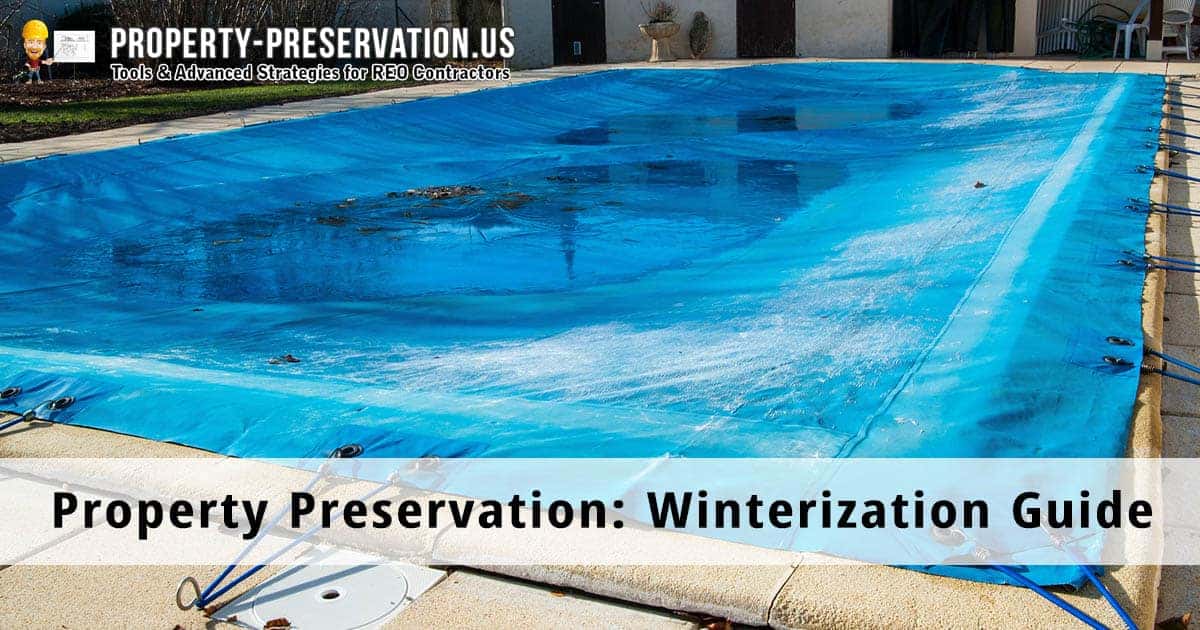
How To Winterize a Pool
How To Install a Safety Pool Cover
How To Winterize An In-Ground Sprinkler System
Tips For Winterizing a Home With Radiant or Steam Heat (also known as Wet Winterization)
- Drain the boiler and all heating loops. Repair, replace, or install (as necessary to comply with state health department requirements) a Reduced Pressure Zone (RPZ) valve.
- Fill the boiler and all heating loops with a non-toxic antifreeze (propylene-glycol) solution tested to a freeze point of 40 degrees Fahrenheit or lower. Flush all lines and bleed all vents.
- Return the heating system to normal operating temperature and pressure. Check the entire system for proper operation. Leave the heat on and set the thermostat to 55 degrees.
- Tape the furnace electrical switch to the “on”position. Tape a card above the switch stating, “Do Not Remove Tape. Do Not Turn Off”.
How to De-Winterize a Property
De-winterizing a property is the opposite of winterizing it. De-winterizing will allow you to make the plumbing system usable again so it can be checked for leaks before it is used by the occupants.
To de-winterize, simply follow these steps, taking a photo of each:
- Remove and dispose of winterization notices, warnings, and stickers
- Conduct a pressure test to ensure the system can still hold 35 psi for 30 minutes
- Close all spigots, faucets, water lines, and valves
- Reconnect the water meter
- Prepare faucets for water flow by removing the aerators. This will allow debris to drain from the system
- Reconnect appliances such as refrigerators, washing machines, dishwashers, and water heaters to the water supply
- Open water supply valves to turn on water, then check for leaks
- Fill hot water tank with water
- Turn on heating system
- Connect electric or gas to hot water tank
- Make sure heating system is working properly and set thermostat to 55 degrees
- Wait for heating system to go through a full cycle to make sure it will work unattended
- Run water through all faucets and spigots to flush antifreeze
- Bleed air from plumbing system by letting the faucets and spigots burp
- Flush toilets
- Check again for leaks
- Never leave a property with leaking plumbing or without heat
FHA Attachment Regarding Winterization Requirements and Cost Schedule
As with everything, the HUD have developed a set of guidelines that outline how utilities and properties should be maintained during the winter to prevent frost damage. These guidelines also contain information about wells and sump pumps.
I. Winterization of utilities
Unless the variations section of the chart below specifies otherwise, all utilities should be turned off. In some states, heat should remain on. If this is the case, the heat should be maintained at 55 degrees Fahrenheit unless specified otherwise.
Condominiums and attached dwellings:
If a condo or attached dwelling is part of a Planned Unit Development (PUD), the water services and utilities should remain on throughout the winter. If the property uses a community water service, contact the realtor or asset manager for information as to how to maintain water services. The same applies for shared electrical services.
Equipment damage:
If you fail to complete your responsibilities according to the winterization guidelines, you may be held accountable for any damage to the plumbing and heating systems that arise.
Sump pumps:
In properties in which a sump pump is installed to keep basements and other lower-ground areas dry, the electricity should be left on to allow the sump pump to operate, even if the property is located in a state in which the electricity should be turned off. Ensure that you check the sump pump is fully operational as part of your maintenance services. If the existing sump pump is broken, or you believe there is a requirement to have one installed, you will need pre-written approval if the cost of installing the sump pump exceeds $250.
Utility Accounts
Utility accounts including electricity, gas, home heating oil and water, should be in the Mortgagee’s name until conveyance of the property to HUD. The Mortgagee should pay the bill and may claim reimbursement for utility costs covering the period from the date of vacancy until the end of the billing cycle that includes the date of conveyance. Payment of a utility bill that includes charges for a portion of a billing cycle that is post conveyance is the exception to HUD’s policy on non-reimbursement of expenses after the conveyance date. It is the Mortgagee’s responsibility to notify the utility company that ownership of the security property has been transferred to HUD (to the attention of the M&M contractor), upon conveyance. A copy of the notice should be maintained in the claim review file.
In states where utilities should remain on, if there is any reason to believe that a Mortgagor may abandon a property, the Mortgagee should contact the utility company to request that the Mortgagee be notified of non-payment of utilities so that utilities can be transferred to the Mortgagee’s name and the heat remain on if the Mortgagor vacates.
Propane and oil systems:
If propane or oil heating systems are in use, put in place a “keep full” contract with the supplier in properties that require the heat to be on at all times.
II. Water
Domestic water:
Unless an ongoing water supply is required, the local water supply company should be contacted, the water supply should be shut off, and a final meter reading should be arranged. No waterlines or meters should be removed because this may incur a fee from the water utility company. In the event that a water meter needs to be installed, the permissible expenditure is up to $350 for an electric heater or $420 for a gas heater. These pre-approved limits include the cost of installation.
Wells:
If the property’s water is supplied by a private well, this should be switched off at the breaker panel, the breaker should be taped off, and the water supply line between the pressure tank and the property should be disconnected. The pressure tank itself should be fully drained. If it is surface mounted, the pump housing should be drained. If it is submersible, the valve should be disconnected, and all pump, suction, and piping equipment should be fully drained. A hose bib should also be installed on the pressure tank side of the breaker and tagged “For Water Testing.” Any additional fixtures should also be winterized.
Reduced Pressure Zone Device (RPZ or RPZD):
Some properties may have an RPZ installed. The purpose of this is to prevent backflow and protect the water supply from being contaminated. If the property has an RPZ in place, contact the local authority for specific instructions as to the regulations pertaining to the installation and use of these devices. If there is a requirement to install or replace an RPZ, you will need to get pre-written approval from the RPZ if the cost of doing so will exceed $70.
III. Winterization
If you are operating in a jurisdiction in which winterization is required, you will need to winterize the property between October 1st and Match 31st. There are some exceptions to these time periods and these can be found in the section on “Local Variation from General Requirements.” Winterization should be possible in one visit and should be performed once a year. In the event that the property does need to be rewinterized for some reason, you will need to obtain prior approval. Winterization should include all of the following:
- Cleaning the toilets and draining all plumbing, heating systems or any other areas of the property that contain water that can potentially freeze and cause damage.
- If you need to use air pressure to clean out the system, this is acceptable, as too is the use of antifreeze. However, only use these measures if you believe they are imperative to preventing water from freezing and causing damage.
- Check the regulations and legal requirements that are in force in the area in which you operate and ensure that you perform winterization activities in accordance with these.
- Take “before” and “after” photographs to document the process. Make sure you date each image and include the address of the property at which it was taken.
Dry Heat Systems:
Drain all hot water heaters and piping to prevent frozen water from causing damage. Ensure that you keep valves and faucets open throughout the process and that you close them once the draining process is complete. Place a suitable amount of antifreeze in all fixtures and in tanks and cisterns.
Wet Heat, Radiant, Hydronic or Hot Water Baseboard Systems:
Complete the draining and preventative measures as per those used for dry heat systems. Make sure all radiators are open throughout the process and do not remove any bleeder pins from the radiators. All pipes that supply the radiators should be drained and an air compressor should be used to fill them with air. Place a suitable amount of antifreeze in all radiator pipes.
Steam Heat Systems:
Complete the draining and preventative measures as per those used for dry heat systems. Be careful to verify whether the heating system is hot water or steam heated in advance. A telltale sign is that steam heat systems will incorporate valves at the bottom of the radiator. All pipes that supply the radiators should be drained and an air compressor should be used to fill them with air. Place a suitable amount of antifreeze in all radiator pipes. If you think there may be a problem with the heating system, report this to the AMC. As part of the winterization process, you should check that the system is working and that there are no leaks. To do this, use an air compressor to pressurize the system to 53 pounds and inspect for leaks. The general rule of thumb is that the system should be capable of holding the air pressure without leakage for at least 30 minutes.
IV. Repair Bids
The Mortgagee may spend up to $250.00, for required repairs or installation of any new equipment required to maintain utilities or properly winterize a property including but not limited to, water wells, water meters, heating equipment, etc. Where such repairs will exceed $250, the mortgagee shall obtain two independent competitive bids and submit the bids to the appropriate M&M contractor for approval. Please advise the M&M where the meter may only be removed by the utility company.
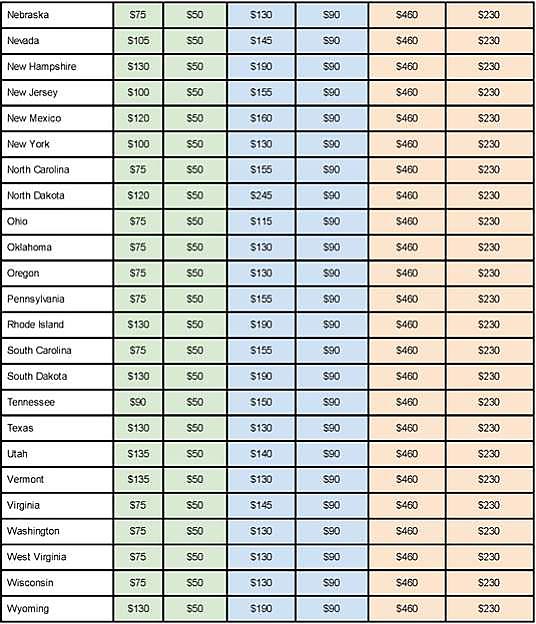
LOCAL VARIATIONS FROM GENERAL REQUIREMENTS
ATLANTA Homeownership Center
Illinois/Indiana
Winterize year round, regardless of the month the property is secured. However, heat will remain in shut down mode. Utilities are to remain off unless required to operate a sump pump.
Caribbean
Do not winterize.
Florida
The water supply should be shut off at the curb. Notify utility companies to cancel all services. Do not drain the water heater or water lines. Do not winterize.
Jacksonville Florida ONLY
Winterize from September 1 through April 30 from Jacksonville north to the Georgia line. However, heat will remain in shut down mode. Utilities are to remain off unless required to operate a sump pump.
DENVER Homeownership Center
Colorado
Winterization is required from September 1 through April 30. Heat is to remain on in condominiums and town-homes.
Kansas, Missouri, Oklahoma
Winterization is required from September 1 through April 30. However, the heat system will remain in shut down mode. Utilities are to remain off unless required to operate a sump pump.
Minnesota, Montana, Iowa, North Dakota, Wyoming
Winterization is required from September 1 through April 30. Utilities and heat are to remain on.
Wisconsin
Winterization is required from September 1 through April 30. Turn water off at meter in house ONLY. Heating system will remain in shut down mode. Utilities are to remain off unless required to operate a sump pump.
SANTA ANA Homeownership Center
Turn water off at the street after winterization in all Santa Ana M&M contract areas, except Alaska.
Alaska
All properties should be winterized year round. Heat should be left on with the thermostat set at 55 degrees Fahrenheit. Properties should be conveyed with water, gas, and utilities ON. Propane and fuel oil delivery services should remain on automatic fill. Utilities should remain in the servicing Mortgagee’s name until conveyance. The servicing Mortgagee is instructed and authorized to switch utilities into HUD’s name effective on the date of conveyance.
Water service may be turned off at the street (key box) only if the property has a forced air or electric heating system and the domestic water system has been properly winterized.
Arizona/California
Winterize properties above 2,000 feet only. However, the heat system will remain in shut down mode. Utilities are to remain off unless required to operate a sump pump.
Hawaii/Pacific Islands
Do not winterize.
Nevada
No winterization except for Pahrump zip code 89041 and Mt. Charleston zip code 89124. All other winterization is completed on a case‑by‑case basis. However, the heat system will remain in shut down mode. Utilities are to remain off unless required to operate a sump pump.
Reno, Nevada
Winterize from September 15 through April 15. However, the heat system will remain in shut down mode. Utilities are to remain off unless required to operate a sump pump.
Oregon
Winterize from November 1 through March 31 only. However, the heat system will remain in shut down mode. Utilities are to remain off unless required to operate a sump pump.
Washington
Winterize from September 15 through April 15. However, the heat system will remain in shut down mode. Utilities are to remain off unless required to operate a sump pump.


What does it mean to “blow out the plumbing lines”?
Blowing out the plumbing lines involves attaching an air compressor to the plumbing supply pipes so that all of the water can be blown out of the pipes in order to protect them from freeze damage. Many Property Preservation companies have requirements as to the size of the air compressor that must be used when completing this part of a winterization.
What kind of antifreeze is used for Property Preservation winterizations?
RV grade antifreeze is to be used, which is “pink” in color. Do NOT use the same type of antifreeze you would put into your car. Home Depot sells the RV antifreeze.
While out today, I encountered a frozen pipe situation. The basement appeared to be ok, running water in basement stationary sink and in basement bathroom. I drained hot water tank. When I got upstairs to open valves, there was frozen water in the toilet. I couldn’t turn the water on or off, handles on faucets were frozen. I put antifreeze in the basement toilet, sink and shower drain also, in the main drain by the stationary tubs. I zip ties the main line. So, my question is how do I thaw out the pipes to complete the winterization? How would I bid this out?
you would usually have to get the electric turned on so the property could have the heat running,if not do that then what i would do is take a small heater hook it to a generator for power and sit it in the bathroom that the pipes are frozen in do the rest of the wint once what your suppose to do to complete the wint ,once you are done with everything else it should be thawed
I’m new to this. What is the standard, or expectations of winterization re-checks?
what is re-winterization? please provide a valid definition.
Thank you
Can someone please, for the life of me just tell me what a good beginner compressor to but is? I’ve done research, read forums and books but I can’t & do not want to buy a lemon! The picture in this article looks like one I’m trying to. But, a pancake 6 gallon air compressor
if you’re only going to use the compressor for winterizations then any compressor that can put out at least 45 PSI. It’s recommended you get a gas compressor because a large percentage of the houses you winterize will be without power. If you have a generator and don’t mind loading/unloading it then an electric compressor is fine. Hope this helps.
HI,
Can someone tell me what model compressor I would need?
Can you do a pressure test on a water lines in a house that was previously winterized and been sitting without heat? We’ve been instructed to repair a new utility sink/trap and to pressure test after installation. Water and heat are off already though.
How much would it cost for one to come pressure test my boiler system
My home has radiant heat, hydronic underfloor PEX lines with a boiler and pumps. The bank winterized the home in march 2017 and I moved back in in July. The boiler is destroyed, leaking like a sieve .. damage in excess of $5000 and I cannot afford a new system
What could be the reason why the main water valve isn’t zip tied if completed full winterization in the property?
There is a 2 unit property, unit is occupied the other is vacant.there are 2 hwt and boilers, is the crew required to winterize both sets of mechanicals?why?
You don’t need to be licensed as a plumber to complete winterizing?