

Securing a property is typically part of a Initial Services Work Order. An Initial Services Work Order starts off by gaining access to a property by removing one of the existing locksets and then installing a new one in it’s place along with a placing a lockbox with a working key inside. Your client should instruct you as to which key code you need to use.
There are several other areas at a property that may need to be secured, such as swimming pools, hot tubs, garages, sheds, missing or broken windows and missing or broken doors. You can find information about how to secure each of these on this page.
Tools Needed To Complete Securing Orders
- cordless & corded drills
- drill bits (you will need these for drilling out locksets)
- 2 pry bars
- “bank coded” knob locks
- “bank-coded” deadbolts
- “bank-coded” padlocks
- lockboxes
- hasps (these are used with padlocks for securing garages, sheds, etc)
- window locks
- slider locks
FHA Attachment Regarding Lock Changes and Securing Requirements
As with the cleaning services, the HUD has a specific set of guidelines that govern the provision of maintenance and security services. These include a maximum cost that can be charged for providing these services and any other repairs. We’ll take a look at these shortly.
In addition, some lenders and realtors may have their own guidelines and requirements.
If you find yourself presented with two different sets of policies, it is usually advisable to follow those provided by the HUD. These are generally regarded as the industry standard. If there are any additional requirements over and above these, take a look at the lenders’ work scope.
For the purposes of this training, we are going to focus on the HUD guidelines. These will give you a basic grounding in the rules and regulations that govern preservation services. Before you start carrying out any work, you need to be fully aware of what the requirements are and should be confident that you can perform them to the required industry standard.
Changing Locks
Unless you have past experience of changing locks, this is something that I recommend you leave to the experts. Professional locksmiths can remove locks in a matter of seconds, so it’s worth paying up for their services as opposed to wasting your time messing around.
I have used a mobile locksmith for many years. He simply pulls up at the property, uses a special tool to bust the lock and then replaces all the exterior locks and hands all the spare keys over to me. Try and find a reliable provider you can trust and who can be available at the drop of a hat.
If you can gain access to the property without needing to pick the lock, then by all means do so. Changing the locks yourself can be pretty straightforward and will save you some cash, but do make sure you do a professional job and that the property is fully secure.
In addition to changing the locks, you may also be required to put padlocks on all external gates and entryways.
If there is an electric garage at the property, disable the mechanism by unplugging it. You can then disable the garage door release mechanism by padlocking it.
I. Minimum Securing Requirements (Post Foreclosure)
As previously mentioned, the HUD has some minimum guidelines that should be adhered to when securing the property. These are as follows:
- Fully secure all windows and doors.
- Replace all broken glass or board up any windows that have panes of glass missing.
- Replace all exterior locks using pre-approved locksets or their equivalent. Pre-approved locks are as follows: Kwikset No. 400T; Kwikset No. 400P or Kwikset No. 400V. Each lock should have identical key codes.
- If the main entry door has a deadbolt, disable the deadbolt and replace the handle set with a Kwikset lock (or equivalent).
- All entryways that offer access to the living area, attached outbuildings or garages, and basements should be secured with a strong slide bolt. If a deadbolt is already in place, re-key it according to the specifications of those used on the front and rear entry doors.
- Secure all external access points to garages or outbuildings with a solid padlock.
- Replace any locking mechanisms that are used on the windows if they are broken or missing.
- Ensure that you record all key codes and fully document the locks that have been replaced in the “Comments” section of the HUD Form 27011.
- Do not nail any windows or doors shut because you or the mortgagee will be held responsible for any damage that results if you do so.
- Ensure all sliding doors are double locked.
- Unplug automatic garage door and gate openers. Ensure doors and gates can be opened without the use of an automatic garage door opener. Leave any remote controls in a kitchen drawer and note their locations in the “Comments” section of HUD Form 27011.
Minimum Securing Requirement (Pre-Foreclosure)
1. At a minimum the Pre-foreclosure securing requirements should include the items listed in “I” above, except the rear entry door lock must not be changed to allow borrower access, if applicable.
II. Temporary Roof Repair
Roof damage left unattended exposes a property to deterioration; moisture accumulation and mold growth. A separate cost item in the amount of $400 has been created for temporary roof repair to protect the interior of properties from further damage. M&M approval is not required if the cost of the temporary repair does not exceed the maximum allowable amount of $400. The Mortgagee should submit form HUD-50002, “Request to Exceed Cost Limits for Preservation and Protection,” for any temporary roof repair that exceeds the maximum allowable for roof repair. Temporary repairs (e.g., tarping/patching/or replacing loose shingles) should be performed immediately upon discovery of roof damage. Tarps and other temporary measures may be used to prevent further deterioration only until permanent repairs can be completed.
If a property has sustained roof damage that is not surchargeable and the property is scheduled for conveyance within 30 days of the date a roof leak is discovered, the Mortgagee may convey the property with a tarp or other temporary repair. Mortgagees should notify the M&M in advance when they will convey a property with a temporary repair and should provide evidence that the damage is not surchargeable and was only recently discovered. Failure to provide this notification may result in re-conveyance.
If the damage is discovered 31 or more days prior to the conveyance date, the Mortgagee should affect a permanent roof repair, whether or not the damage is surchargeable. If the cost to permanently repair the roof exceeds the cost allowable for this item, the Mortgagee should submit an over-allowable request.
Properties with surchargeable roof damage may not be conveyed with a tarp or other temporary repair without the prior approval of the M&M contractor.
Mortgagees should retain before and after photographs and a detailed description of what actions were taken to prevent further roof deterioration or water leakage. The documentation must be maintained in the claim review file to support the reimbursement of the costs claimed.
III. Swimming Pools
Fees for securing or winterizing swimming pools and hot tubs or spas are not included in the maximum allowable limit per property. See below for the maximum costs for securing pools and spas. The costs for permits to drain pools/spas by local governments are included in the maximum limit for this cost item and will be reimbursed based on the actual cost incurred.
Prior written approval from the M&M contractor is not required for securing or winterizing pools unless noted otherwise in variances below. Before and after photographs are required. At a minimum the Mortgagee should:
- Pump out the pool leaving 4 feet of water in the deep end (this amount may vary depending on the elevation). After pumping, apply chlorine to control the algae in the remaining water. Circulate remaining water to mix chlorine. Isolate and drain pumps and filters. Remove all trash from the interior of the pool and haul it away.
- If there is a pool cover present, secure and cover pool. Check with state and local codes to verify whether the pool should be fenced.
- If there are no jurisdictional requirements, and no existing pool cover, secure according to the diagram on page 20. However, no pool cover is required in Arizona, California, Hawaii, Nevada and Other Pacific Islands.
- Secure entrance gates to fences surrounding pools with a lock or padlock and chain when no lock is present.
- Replace any damaged or missing boards or sections of fence surrounding pools.
If the property has an above ground pool in good condition, built up with decking or other infrastructure that will support a pool cover, treat it as an in-ground pool. Above ground pools in poor condition or that cannot be secured in accordance with the guidelines herein, should be removed. If an above ground pool is removed, remediate any depression in the ground that might constitute a hazard.
You can find detailed instructions on how to secure a swimming pool at the end of this article. You can go there by clicking this link.
WARNING: Check local area standards before draining the pool. In areas where there is a high ground water level, removing too much water may cause pool uplift and damage the pool.
IV. Boarding Windows and Doors
Ensure you follow HUD guidelines when boarding windows and doors. In some situations, you may require written approval in advance of blocking windows and doors. Click here to learn more about boarding.
V. Photographs
Effective for all claims filed 30 days from the date of this Mortgagee Letter, preservation and protection actions should be documented using digital photography. Rather than establishing a maximum allowable number of photographs and reimbursing Mortgagees on a per picture basis, HUD will provide a flat fee reimbursement of $30.00 for photographs, regardless of the number of pictures required. The photographic fee is included in the lock change/securing maximum allowable cost per property.
Photographs are required to document inspections, initial property condition, one-time securing service, boarding, yard maintenance, debris removal, winterization and personal property/debris removal as part of an eviction. The Mortgagee should photograph the exterior and interior of the property at the time of the Initial Inspection.
All photographs should be dated, labeled and maintained in the Mortgagee’s claim review file and made available to HUD or its M&M contractor upon request. If photographs cannot be produced at the time of the claim review, the following will be disallowed:
a. All unsupported expenses
b. All expenses claimed for personal property/debris removal including evictions
Installing a Lockbox
A work order might not only request that you change the locks, it might also instruct you to install a lockbox.
You should know the types of lockboxes your clients require and be sure to have them in your inventory at all times. Clients sometimes use alpha codes, sometimes numeric codes, and sometimes a combination of the two.
Most lockboxes come with a set of instructions, and it’s quick and easy to set the lockbox to the correct code by simply following these instructions.
Take a photo of the lockbox in the open position (with the keys showing) on the knob lock you have just installed. If you’ve installed a padlock anywhere else on the property, remember to put the keys for the padlock in the lockbox as well. Take a second, close-up photo of the lockbox when it is closed showing the correct code. After placing the keys inside the lockbox and closing it, turn the dials on the lockbox to a random setting and take a final photo of the lockbox in position.
Videos Showing Property Preservation Securing Techniques
How To Secure Swimming Pools With Safety Covers
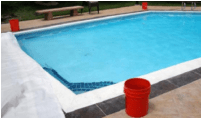
Fill 5 Gallon Buckets with water and place one at each corner of the pool. Place the remaining buckets evenly around the edges of the pool.
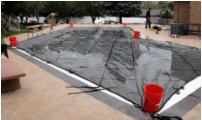
Unroll the Cover and place it in position over the pool. Set the Buckets over the Cover’s edges to hold it in place. Adjust cover for equal overlap on all sides. Mark anchor points 18” from cover.
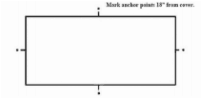
Mark initial 4 anchor points. These should be located at the center strap of each side of the pool. Anchor points must sit 18” from the edge of the cover (not the edge of the pool). They must be in line exactly with each strap.
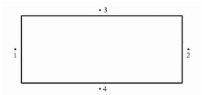
Initial anchor installation can begin after you determine the order in which they will be installed. Most manufacturers recommend beginning with the ends of the pool and then moving on to the sides of the pool, as illustrated above.
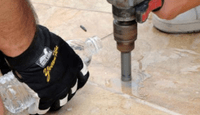
Use the hammer drill with a 3/4” masonry bit to create a neat 3” deep hole in the deck. If necessary use cool water to keep the drill area cool.
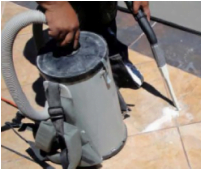
Use a shop vac to clear the drill area of debris and water.
If desired, apply a small amount of epoxy glue to the anchor hole. This will create a stronger hold when the anchor is installed.
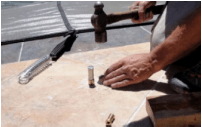
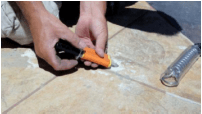
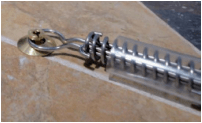
Separate the brass insert from the brass anchor casing and set it aside. Use a hammer and tamping tool to push the brass casing into the hole created in Step 5. – Use extreme caution not to damage the deck.
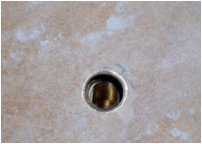
The brass anchor casing must be pressed until the top is flush with the deck surface. If some slight chipping of the deck has occurred, Anchor Collars may be used to cover the area around the anchor.
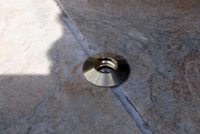
If deck chipping makes Anchor Collars necessary, place a ring over the anchor.
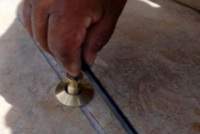
Use the Allen Wrench to insert the anchor insert into the brass casing. Leave approximately 1/3 of the anchor insert above the deck surface. This instruction is the same if anchor collars are not used.

Fasten springs to each of the 4 straps. Tighten straps until springs are compressed by 50%. Place the end of the installation Rod through the loop at the end of the spring. Slide the loop up the Rod until the rod end can be placed over the anchor.
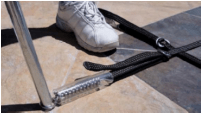
Slide the spring down the rod to the deck. Twist the rod to release it from the loop and pull it away from the anchor.
The Strap Spring loop should now be held in place by the anchor top. The strap should be held taut. Repeat these steps to install an anchor at each of the 4 straps and then pull the straps onto the anchors.

Snap a chalk line 18” from the edge of the cover on all four sides of the pool. This line should be aligned with the 4 initial anchors installed already. This chalk line will ensure that the remaining anchors will be aligned.
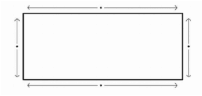
When center straps have been secured to the anchors, begin installing the rest of the anchors. When all anchors have been installed, secure the remaining straps by working your way from the center anchors to the corners, as shown in the illustration above.
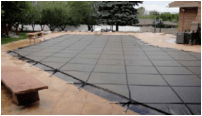
Inspect your installation. When complete, the Cover will be held taut, roughly even with the deck surface. It should not be drooping down on the pool water. Make sure all springs are no more than 50% compressed.


How do I know what lock codes to purchase and what type of lockbox to purchase?
@greg cullison – It is placed on the work order text bro. It is already given.